ABAP Workbench Tricks #3: 10 Hidden Features for ABAP Development
2014-08-07 ABAP
So you’ve left behind your rookie days as an ABAP developer, and you think you know it all? Well, think again. In part 3 of this series, I’m going to show you a few well-hidden settings and features in the ABAP Development Workbench that might surprise you.
Recommended Now
Fire TV Stick Lite Essentials Bundle
This bundle contains Amazon Fire TV Stick Lite and Mission USB Power Cable. The USB power cable eliminates the need to find an AC outlet near your TV by powering Amazon Fire TV directly from your TV's USB port. Includes special power management circuitry that enhances the peak power capability of the USB port by storing excess energy and then releasing it as needed.
Check it out on amazon.com →Hidden feature 1: advanced code completion
You’re using code completion, right? Every time you type the first few letters of an ABAP keyword, the development workbench proposes applicable statements and inserts them into your code on the press of a key. But are you using this to its fullest extent?
What is available with regards to code completion depends on your SAP application server version and the version of your SAPGui, but you shouldn’t miss out on the most useful thing: the suggestion of variable names and other non-keywords.

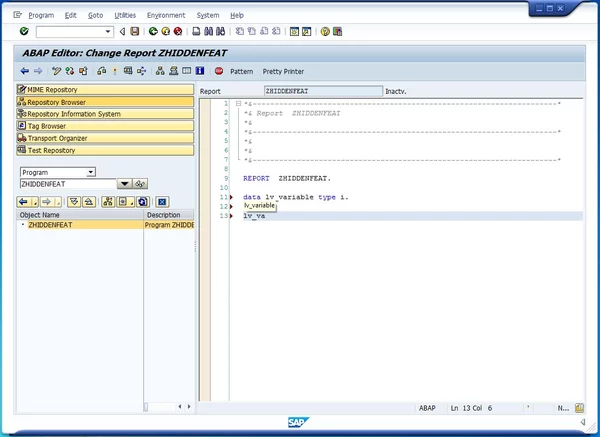
With this setting, the ABAP workbench will propose the names of variables that you defined before, saving you a considerable amount of time as opposed to having to type them out each time.
To enable this feature, click on the Settings button in the SE80 transaction (that’s the tiny button at the bottom right that’s overlooked very easily), go to Code Completion, and set the tick mark at Suggest Non-Keywords from the Text. Now, you’re getting ABAP code completion for variables too – an incredibly useful feature!

Suggest Variable Names in ABAP Development Workbench
Hidden feature 2: insert dates easily
Got a change log in your program header, as many companys require? Don’t waste time thinking about what date it is or typing it out. Just right-click on the place you want the timestamp to be, and select More > Insert Date and Time from the context menu. Pick the format you want and you’re done. Saves a few seconds each time you have to provide the current timestamp.

Insert Date and Time in ABAP Code
Hidden feature 3: code templates
Similar to the pattern feature i discussed yesterday and on Monday, there’s a “lightweight” way to create commonly-used code fragments automatically: code templates. These are designed to help you out in these “darn, that assignment should go into an IF-clause” moments. You mark a piece of code, right-click it and select Format > Surround by Template from the context menu. Select the template you want and click it. Your code is now enclosed in an IF clause (or whatever you selected)!

ABAP Code Templates
As with patterns, you can also define your own templates. To do that, just select Format > Extract Template in the context menu. You can add placeholders for marked text, the cursor position and other things – just try it out to see what you can do.
Hidden feature 4: change cases
Sometimes you want to change text or a keyword to uppercase or lowercase quickly. Instead of retyping everything, the ABAP editor has some nice functionality to do that for you. Mark the text you’d like to change and right-click it. From the context menu, select Format > Change Case. There are several options, and each can be reached conveniently with a hotkey:
- Lowercase (Ctrl + L)
- Uppercase (Ctrl + U)
- Capitalize (Ctrl + J)
- Sentence Style (First letter of first word capitalized; Ctrl + T)
- Invert Case (Ctrl + K)
Hidden feature 5: split your window
Often, you want to compare code from two places in the same program. You could of course open a new session and open the same program again, but of course you can’t edit it in both sessions, so that’s not a nice solution.
Luckily, there’s something much better available. Once you open a program that is long enough that the vertical scroll bar appears, there’s a tiny button (more a wide line, really) at the very top of it. Drag that, and pull it down into the window. Voilà – you have now two separate views on the same program, and you can make changes in both views at the same time.

Drag down the little button at the top of the scrollbar to split your screen.
Hidden feature 6: split screen editor
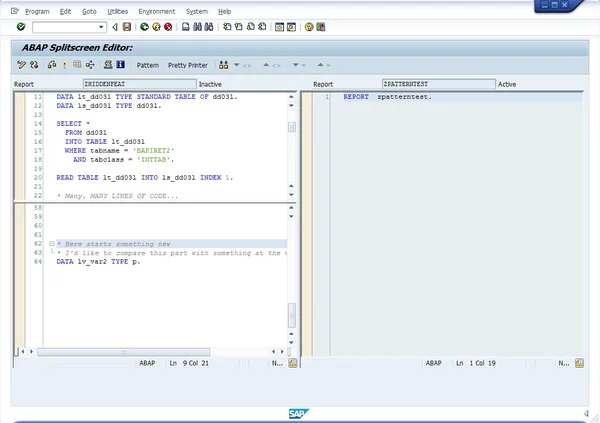
The split screen is nice, but what if you want to compare code from two different programs? There’s a solution for that, too, and it’s just as easy. In the menu of transaction SE80, select Utilities > More Utilities > Splitscreen Editor. You can then provide the name of another program, function module or class to compare your original program to, and there’s a variety of comparison helpers available. You can even compare your program with another one in a different system!

Compare two ABAP programs with the Split Screen Editor
Hidden feature 7: use the worklist
So you’re working on a big project, and you’re doing things in various places and the same time, jumping back and forth between them. How easy is it to forget something or overlook a temporary solution that still needs to be replaced with something better? It’s happened to me too often to count.
To remedy that, there’s a nice little feature that lets you bookmark lines of code to work on later. You can add a little comment saying what you still need to do, so nothing gets lost. Display the worklist by selecting Utilities > Worklist > Display. You’ll get a little tab that lets you add places in ABAP objects where you still need to work. Don’t forget to click on Save after you’ve added something!

Use the worklist to set bookmarks on things you’re currently working on.
If you like the worklist feature and work with it a lot, you can make the worklist appear by default when you open SE80. To do that, select Utilities > Settings from the main menu. On the ABAP Editor tab, go to Worklist and set the tick mark for Display Worklist. It doesn’t give you a message, but the worklist will be there each time you start the development workbench.
Hidden feature 8: advanced clipboard functions
Apart from the normal clipboard that you already know, there’s more clipboard functionality available in the ABAP workbench. I’ve discussed some of this in my article on the extended clipboard, however there’s some additional stuff that is interesting to know.
The extended clipboard is nice when you need to copy several, disjoint lines of things from one place to another. But what if you want to insert a certain piece of code multiple times and don’t want it to be deleted from the clipboard over time? You could create a template, but that seems over the top.

Using buffers in ABAP development
For these use cases, the ABAP editor gives you three additional clipboards, called buffers. You can access them via the context menu under Block/Buffer. The X, Y and Z buffer can be used just like the regular clipboard – you can save things in them via Copy to buffer and paste it into the text with Insert buffer. This way, if you have something that you need several times over a longer period, the buffer is the way to go.
Hidden feature 9: find your last change
Another neat little feature is this: suppose you’ve changed something in a very long piece of code, and you can’t find the place where you’ve done it anymore. Instead of searching through hundreds of lines of code, just open the context menu and select Navigation > Go to last change. It will take you directly to the line of code you edited last.
Hidden feature 10: use code examples
My last featured feature (ha-ha) is something that is overlooked by many developers. In the Development Workbench, you have access to a lot of coding examples via the main menu under Environment > Examples. Even if you’re a more experienced developer, you’ll find all kinds of things in here that you might need.
Especially the controls examples are very useful when it comes to implementing a control that is rarely used, such as a list tree or a custom container. You find here useful code examples and templates to copy and use in your own code. Make use of these, they save you a lot of time that you would need to re-invent the wheel!

