Implementing Additional Checks in Table Maintenance Dialogs
In yesterday’s post about table maintenance dialogs, I discussed how to create a simple table maintenance dialog in SAP ERP. Today, I will explain how this dialog can be enhanced with additional logic, for example to implement custom checks on data entered.
Recommended Now
All-new Echo Dot Smart speaker with Alexa
This bundle includes Echo Dot (3rd Gen) Charcoal and Philips Hue White A19 Medium Lumen Smart Bulb, 1100 Lumens. Built in Smart Home hub. Ask Alexa to control Zigbee-compatible devices. No additional Philips Hue hub required. Two choices for easy smart lighting - Start setting the mood with Hue Smart bulbs and your Echo device, supporting up to 5 Hue Bluetooth & Zigbee smart bulbs. Add the Hue Hub for whole-home smart lighting (up to 50 light points) and bonus features.
Check it out on amazon.com →Use case
A typical business case for the use of additional checks is the implementation of additional checking logic for data which the user entered. In my case, I’ll use the same table as last time, which has the company code as a key field. I will implement a check to verify that the company code that is entered actually exists.
Using table maintenance dialog events
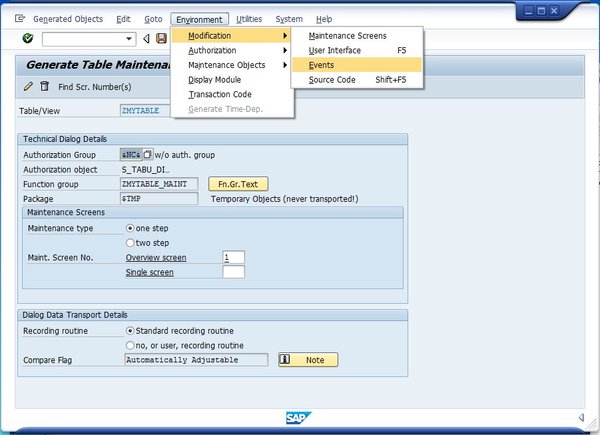
The implementation of custom logic in table maintenance dialogs is done using so-called events. To get access to these, select Environment > Modification > Events from the menu while in the table maintenance generator screen.

You will get a popup informing you that you’re changing SAP data, which you can safely ignore. In the list that is opened, you have to select which event you want to use. Each event is tied to a certain point in the data maintenance process – if you’re familiar with the hooks programming pattern, that’s exactly what it is.
Your next task will be to pick the correct event for the job you want to do. Since there are close to 40 different events available, it’s best to use the SAP documentation for extended table maintenance events, which you can also access via the information button (![]() ). For my example, I want to perform a check after data was entered. The correct event for this is 05. You also need to enter a form routine name. Click Save after you’ve entered your data (important!) and click on the button in the Editor column afterwards.
). For my example, I want to perform a check after data was entered. The correct event for this is 05. You also need to enter a form routine name. Click Save after you’ve entered your data (important!) and click on the button in the Editor column afterwards.

Adding a new event implementation
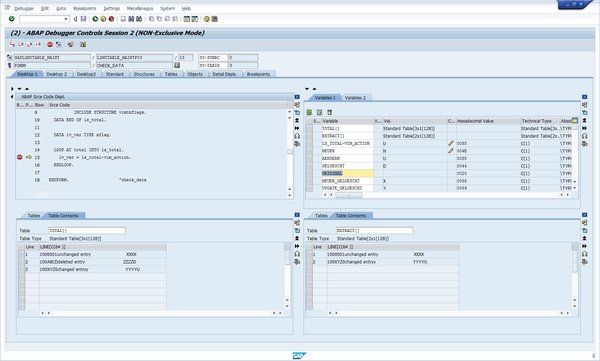
After you have added your include, you’re taken to the ABAP Editor. This is the place where you can implement your custom check logic. Before I’m going into the details of the programming itself, let me explain which variables are available to work with the data in the table.
Interface variables to work with used data
The interface for these hooks is always the same. There’s a set of variables and internal tables that let you work with the data in the table control. It’s documented for each event induvidually (such as for event 01), but the generally available variables are the following.
Internal table TOTAL
The internal table TOTAL contains the complete dataset that is held in the table you are working with. Its structure is a combination of the base table structure and the structure VIMTBFLAGS. This structure contains fields that indicate the processing status of the table row.
Field symbols <ACTION> and <ACTION_TEXT>
Via these field symbols, you can access the processing status of the current table row of table TOTAL, which means they mark if the record was created, updated, or deleted. These field symbols should only be used for events that are called once for each table entry, meaning that they are executed in a loop.
If you want to read the processing status of table rows manually, it’s better to use the field VIM_ACT from the structure VIMTBFLAGS. <ACTION> indicates the processing status of the table itself. <ACTION_TEXT> is used if your underlying data table has a text table attached, and indicates the processing status of the text table.
The following constants are available to check the processing status.
- NEUER (value “N”) – new entry
- AENDERN (value “U”) – updated entry
- GELOESCHT (value “D”) – deleted entry
- ORIGINAL (value “”) – unchanged entry
- NEUER_GELOESCHT (value “X”) – new entry, deleted again
- UPDATE_GELOESCHT (value “Y”) – updated entry, deleted again
Internal table EXTRACT
While the table TOTAL contains all of the data that is in the data table, EXTRACT is the data subset that the user is currently working with. The exact contents of this table depend on the function the user is currently executing within the SM30 transaction. If he is adding new lines, the table EXTRACT will contain only the newly entered lines, while the table TOTAL will contain all old lines plus the new lines. The table EXTRACT has exactly the same structure as the table TOTAL. More information on table extracts can be found here: SAP documentation for table extracts.
Field symbols <XACT> and <XACT_TEXT>
These field symbols work exactly in the same way as the <ACTION> and <ACTION_TEXT> ones, but for the EXTRACT table. They, too, should only be used with events that are called in a loop.
Field symbol <STATUS>
This field symbol provides access to some general information. Especially important is the field <STATUS>-UPD_FLAG, which indicates if any data was changed in the table control.
Structure with the name of your table
Especially important for the event 05 (after adding new entries), this structure will hold the newly-entered data before it is moved to the main table. It can be accessed via the name of your custom table (in my case, the name is ZMYTABLE) and can be used for data checks.

Some of the available variables for extended table maintenance
These are the most important variables that are available in the extended table maintenance interface. There are a few more, but they are used only in special cases or only in a few events. On the next page, I will show you how to use these variables to implement a simple check on entered data.
Implementation of custom table maintenance logic in ABAP
Remember the include file you were taken to when you clicked the Editor button in the events screen? That’s where we’ll continue now. I hope you remember the name of the FORM you provided in the events overview, because this is the routine we have to implement now. Unfortunately, it’s not generated automatically. It takes no parameters, so the first step is to add just a simple FORM with no parameters to your include.
*----------------------------------------*
***INCLUDE LZMYTABLE_MAINTF01.
*----------------------------------------*
FORM check_data.

ENDFORM.                    "check_data
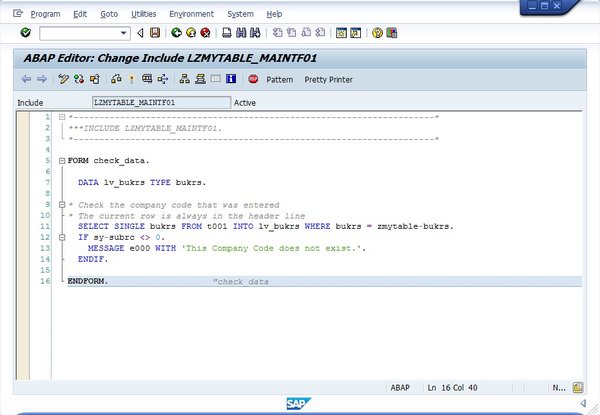
This is what we’re starting out with. Now, it’s important to know what we want to actually check. Since the event 05 is called in a loop for each new entry made by the user, we have a rather simple job. We don’t need to check any flags or processing statuses. All we need to do is take the user-entered data and do a check with it. The complete implementation of the event looks like this.

Complete event implementation
FORM check_data.

  DATA lv_bukrs TYPE bukrs.

* Check the company code that was entered
  SELECT SINGLE bukrs
    FROM t001
    INTO lv_bukrs
    WHERE bukrs = zmytable-bukrs.

   IF sy-subrc <> 0.
     MESSAGE e000
       WITH 'This Company Code does not exist.'.
   ENDIF.

 ENDFORM.                    "check_data
Notice that here, I’ve used the zmytable structure to read the user data. The reason for this is the point in time at which event 05 is called. Here, the entered data has not been transferred to TOTAL or EXTRACT yet, because we have a chance to do checks on the data first.
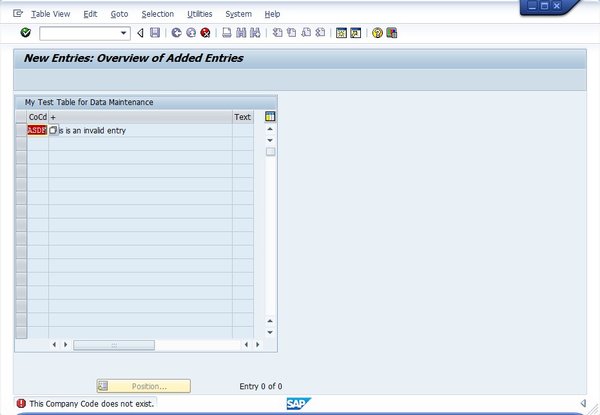
Now, whenever the user enters a company code, the FORM routine will check if it is valid. If it’s not, then an error message will be shown and the user has a chance to correct the data.

The custom check is working perfectly.
This concludes today’s post on extended table maintenance. The next post will be about maintenance views, and how they can be used to give the user additional information.
List of SAP table maintenance dialog events
The SAP documentation for these events can be found here: SAP documentation for extended table maintenance events
| 1 | Before saving the data in the database |
| 2 | After saving the data in the database |
| 3 | Before deleting the data displayed |
| 4 | After deleting the data displayed |
| 5 | Creating a new entry |
| 6 | After completely performing the function ‘Get original’ |
| 7 | Before correcting the contents of a selected field |
| 8 | After correcting the contents of a selected field |
| 9 | After getting the original of an entry |
| 10 | After creating the header entries for the change task (E071) |
| 11 | After changing a key entry for the change task (E071K) |
| 12 | After changing the key entries for the change task (E071K) |
| 13 | Exit editing (exit main function module) |
| 14 | After lock/unlock in the main function module |
| 15 | Before retrieving deleted entries |
| 16 | After retrieving deleted entries |
| 17 | Do not use. Before print: Event 26 |
| 18 | After checking whether the data has changed |
| 19 | After initializing global variables, field symbols, etc. |
| 20 | after input in date subscreen (time-dep. tab./views) |
| 21 | Fill hidden fields |
| 22 | Go to long text maintenance for other languages |
| 23 | Before calling address maintenence screen |
| 24 | After restricting an entry (time-dep. tab./views) |
| 25 | Individual authorization checks |
| 26 | Before creating a list |
| 27 | After creation or copying a GUID (not a key field) |
| 28 | After entering a date restriction for time-dep. views |
| AA | Instead of the standard data read routine |
| AB | Instead of the standard database change routine |
| AC | Instead of the standard ‘Get original’ routine |
| AD | Instead of the standard RO field read routine |
| AE | Instead of standard positioning coding |
| AF | Instead of reading texts in other languages |
| AG | Instead of ‘Get original’ for texts in other languages |
| AH | Instead of DB change for texts in other languages |
| ST | GUI menu main program name |

