First Steps with SAP River RDE
2014-08-22 HANA HANA Cloud Platform River RDE SAPUI5
As promised, today we’re going to look at SAPUI5 application development with SAP River RDE, and we will take out first steps towards building a multi-million-dollar app. But before we can do that, we need to learn the basics.
Registering for SAP River RDE
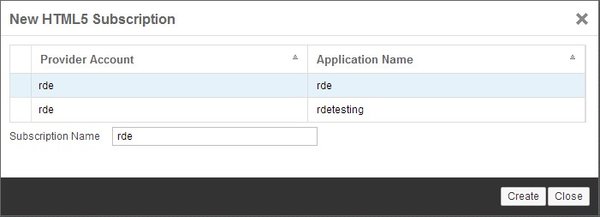
Before you can register as a test user for SAP River RDE, you need access to the SAP HANA Cloud. This can either be your personal test account (you can register anytime you like, I’ve written a post about SAP HCP already), or your company’s account. Whichever way, you need to open your cloud cockpit and change to the Subscriptions tab. Click New Subscription to be presented with this popup, where you have to select rde.

Adding a subscription
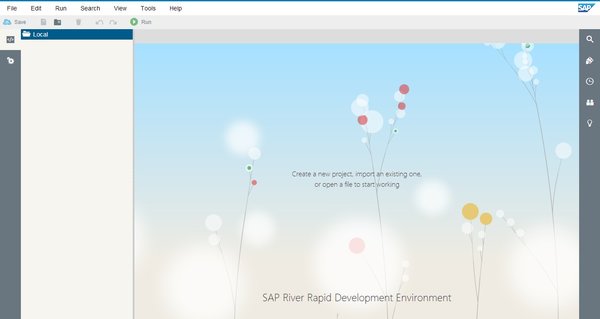
After you’ve done that, rde will show up as a subscription in your account cockpit. To open it SAP River RDE, click on it in the list of subscriptions, and click again on the application URL that is shown to you in the next screen. You should now be taken to the SAP River RDE interface.

SAP River RDE User Interface
Creating your first project in SAP River RDE
After you’ve looked around the user interface a bit, it’s time to create your first project. To do that, right-click the Local folder and select New > Project from the context menu. Enter a project name and select the Empry SAPUI5 Desktop App Project template. This will generate the app descriptor as well as a controller and an XML view for you to start from.

Create a project in SAP River RDE
Remember we’re building a SAPUI5 application on SAP River RDE. Don’t get confused with the names or the landscape – it’s a bit hard to maintain the overview at the beginning, especially of you’re new to both SAP River RDE and SAPUI5. Theres very good SAP documentation on River RDE as well as documentation on SAPUI5.
As our first project, all we want to do is to add some text and a link to the view file of your project. Open the view file that was generated for you – in my case it’s called main.view.xml. You want to add these lines of code to your view.
<mvc:View xmlns:core="sap.ui.core"
 xmlns:l="sap.ui.commons.layout"
 xmlns:mvc="sap.ui.core.mvc"
 xmlns="sap.ui.commons"
 controllerName="view.main"
 xmlns:html="http://www.w3.org/1999/xhtml">

 <html:h1>Welcome to SAP River RDE!</html:h1>
 <html:p>
  This is a paragraph in an XML view of SAPUI5.
  The elements are different from HTML5!
 </html:p>
 <html:p>
  <html:a href="http://www.dev-workbench.com">
   Go to dev-workbench
  </html:a>
 </html:p>
</mvc:View>
Notice that the individual elements are not XHTML or HTML5! They are dedicated XML elements that come from the SAPUI5 interface definition. Consult the API documentation to find out more about the available elements – there’s a lot of pre-built stuff, so you don’t have to invent everything from scratch.
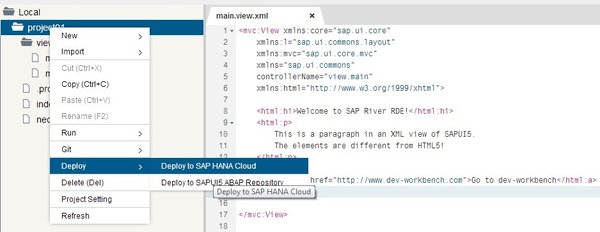
After you’ve finished your view, the next step is to test your SAPUI5 application. Before you can execute your project on the SAP HANA Cloud Platform, you have to deploy it. To deploy you project, right-click it and select Deploy > Deploy to SAP HANA Cloud. Via the git integration tool, a version of your project will be created, moved over to SAP Hana Cloud, and made available as a SAPUI5 application there.

Deploy from SAP River RDE to SAP HANA Cloud
Once you’ve done that, you’re ready to execute your project and see the results. Right-click it again and select Run > Run on SAP HANA Cloud. A popup will ask you for your SAP HANA Cloud Platform credentials. Enter them, and you will be presented with the result of your effort: a HTML website generated from SAPUI5!

Resulting HTML site from River RDE project
Of course, this was an extremely simplified example, but it demonstrates already what River RDE is going to be: a portable, use-from-everywhere development engine that makes application development as easy as never before. I will feature more posts on River RDE and SAPUI5 in the future, showing you how to build advanced apps and use some of the pre-built user interface elements. Stay with me folks!